Showing posts with label rest api. Show all posts

Wednesday, November 9, 2016

BizTalk integration acting as a proxy to REST API for dummies

Overview

These instructions provide easy to follow steps to create a simple BizTalk integration acting as a proxy to a backend REST API.

Instructions


Create a new project.


Add new property schema item to the project.


Rename 'Property1' to 'search_term' in the 'PropertySchema1.xsd'.


At this point it's probably a good idea to give the application name and set signing.

Go to the project properties.


Go to Deployment -> set Application Name value


Go to Signing and in the key file selection select <New...>


Give a name for the key


Build the solution.


Deploy the integration to BizTalk.


Go to the BizTalk Server Administrator Console. Your newly deployed integration should be there.


Next we'll create receive location and receive port.
Go back to the Visual Studio and go to Tools -> BizTalk WCF Service Publishing Wizard.


Select WCF-WebHttp and DeploymentFrameworkTest application.


Request-Response Receive Port is needed for our proxy integration because it needs talk back to the caller.


Give a name for the IIS app. Allow anonymous access. You can change this later in IIS if needed.
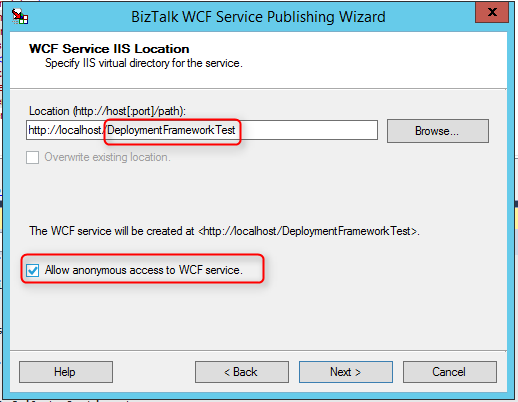


Create.


Fi


Go to IIS Manager, you'll see the app was created.


Go to the BizTalk Server Admin Console.
A receive location and a receive port were created.


Go to the receive location -> Configure.
BizTalkServerIsolatedHost as receive handler basically means this happens outside the BizTalk, namely IIS in this case. Because we creating a proxy that does not in any way do modifications to the data, pipelines are both PassThru.


To the HTTP Method and URL Mapping insert the following code:

<BtsHttpUrlMapping>
<Operation Method="GET" Url="/{search_term}"/>
</BtsHttpUrlMapping>

Then click 'Edit'.


The value for the property namespace can be fetched from the Visual Studio project.


On the messages tab add 'GET'.


OK


OK


Go to the send ports and create a new port.


Set whatever name you want and click Configure.


Set the URI. In the mapping insert the following (replace [your profile] and [your own API key] with you own values you have got from the service):

<BtsHttpUrlMapping>
<Operation Method="GET" Url="/basic?search_word={search_term}&amp;profile=[your profile]&amp;key=[your own API key]&amp;country=se&amp;version=1.1.3"/>
</BtsHttpUrlMapping>


The mapping values are the same as in the receive location.


OK


In Filters set property BTS.ReceivePortName == WcfService_DeploymentFrameworkTest/Service1
OK


Set retry count to 0


OK


Start the application


If you want to see possible error messages edit the "C:\inetpub\wwwroot\DeploymentFrameworkTest\Web.config".

Set includeExceptionDetailInFaults="true", httpGetEnabled="true", httpsGetEnabled="true" and save the file.


Now you can call the integration that proxies the request to the backend REST API and returns the response.


Monday, October 31, 2016

Using BizTalk Behavior Extension to log in to CRM Online


Overview


This is a hands on example about creating, deploying and using BizTalk behavior extension to log in to CRM Online. You need Azure Application ID for the client (BizTalk) and CRM username and password.

The beef of the behavior extension is that it adds or creates an authorization header with a value "Bearer + [token returned from CRM]". The authorization header is then used when the integration tries to connect to the backend REST API address.

Instructions


In Visual Studio create a new C# Class Library project.

Install ADAL to Visual Studio (https://azure.microsoft.com/en-us/documentation/articles/active-directory-authentication-libraries/).

Go to Tools -> NuGet Package Manager -> Package Manager Console
Run "Install-Package Microsoft.IdentityModel.Clients.ActiveDirectory" command.


Add references needed by the project.


Add the code.


using System;
using System.Collections.Generic;
using System.Linq;
using System.Text;
using System.Threading.Tasks;
using System.ServiceModel.Description;
using System.ServiceModel.Dispatcher;
using System.Diagnostics;
using System.ServiceModel;
using System.Web;
using System.ServiceModel.Channels;
using System.ServiceModel.Configuration;
using System.Configuration;
using Microsoft.IdentityModel.Clients.ActiveDirectory;

namespace AppIDAuthentication
{
    class AppIDAuthenticationBehavior : IEndpointBehavior
    {

        public string Username { get; set; }
        public string Password { get; set; }
        public string CrmUri { get; set; }
        public string ClientID { get; set; }

        public void AddBindingParameters(ServiceEndpoint endpoint, System.ServiceModel.Channels.BindingParameterCollection bindingParameters)
        {

        }

        public void ApplyClientBehavior(ServiceEndpoint endpoint, System.ServiceModel.Dispatcher.ClientRuntime clientRuntime)
        {
            
            AppIDAuthenticationMessageInspector inspector = new AppIDAuthenticationMessageInspector(this.Username, this.Password, this.CrmUri, this.ClientID);
            clientRuntime.MessageInspectors.Add(inspector);
            
        }

        public void ApplyDispatchBehavior(ServiceEndpoint endpoint, System.ServiceModel.Dispatcher.EndpointDispatcher endpointDispatcher)
        {

        }

        public void Validate(ServiceEndpoint endpoint)
        {

        }
    }

    public class AppIDAuthenticationMessageInspector : IClientMessageInspector
    {
        string _username = string.Empty;
        string _password = string.Empty;
        string _crmUri = string.Empty;
        string _clientID = string.Empty;

        private string m_Bearer;
        private const string AUTHORIZATION_HTTP_HEADER = "Authorization";
        
        public AppIDAuthenticationMessageInspector(string username, string password, string crmUri, string clientID)
        {
            this._username = username;
            this._password = password;
            this._crmUri = crmUri;
            this._clientID = clientID;
        }

        //Enables inspection or modification of a message after a reply message is received but prior to passing it back to the client application.
        public void AfterReceiveReply(ref System.ServiceModel.Channels.Message reply, object correlationState)
        {
            //Do nothing
        }
          
        //Enables inspection or modification of a message before a request message is sent to a service.
        public object BeforeSendRequest(ref System.ServiceModel.Channels.Message request,
            System.ServiceModel.IClientChannel channel)
        {

            Task<Task> CRMLogin = new Task<Task>(async () =>
            {

                AuthenticationContext authContext = new AuthenticationContext("https://login.windows.net/common", false);

                AuthenticationResult result = await authContext.AcquireTokenAsync(_crmUri, _clientID, new UserPasswordCredential(_username, _password));

                m_Bearer = "Bearer " + result.AccessToken;

            });

            CRMLogin.Start();
            CRMLogin.Wait();
            CRMLogin.Result.Wait();
            
            HttpRequestMessageProperty httpRequestMessage;

            object httpRequestMessageObject;

            if (request.Properties.TryGetValue(HttpRequestMessageProperty.Name, out httpRequestMessageObject))
            {
                httpRequestMessage = httpRequestMessageObject as HttpRequestMessageProperty;
                if (string.IsNullOrEmpty(httpRequestMessage.Headers[AUTHORIZATION_HTTP_HEADER]))
                {
                    httpRequestMessage.Headers[AUTHORIZATION_HTTP_HEADER] = this.m_Bearer;
                }
            }

            else
            {
                httpRequestMessage = new HttpRequestMessageProperty();
                httpRequestMessage.Headers.Add(AUTHORIZATION_HTTP_HEADER, this.m_Bearer);
                request.Properties.Add(HttpRequestMessageProperty.Name, httpRequestMessage);
            }

            return null;

        }

    }    
  
    public class AppIDAuthenticationBehaviorExtensionElement : BehaviorExtensionElement
    {
        [ConfigurationProperty("username", DefaultValue = "", IsRequired = true)]
        public string Username
        {
            get { return (string)base["username"]; }
            set { base["username"] = value; }
        }

        [ConfigurationProperty("password", DefaultValue = "", IsRequired = true)]
        public string Password
        {
            get { return (string)base["password"]; }
            set { base["password"] = value; }
        }

        [ConfigurationProperty("crmuri", DefaultValue = "", IsRequired = true)]
        public string CrmUri
        {
            get { return (string)base["crmuri"]; }
            set { base["crmuri"] = value; }
        }

        [ConfigurationProperty("clientid", DefaultValue = "", IsRequired = true)]
        public string ClientID
        {
            get { return (string)base["clientid"]; }
            set { base["clientid"] = value; }
        }

        protected override void Init()
        {
            base.Init();
        }
        protected override void InitializeDefault()
        {
            base.InitializeDefault();
        }


        public override Type BehaviorType
        {
            get { return typeof(AppIDAuthenticationBehavior); }
        }

        protected override object CreateBehavior()
        {
            AppIDAuthenticationBehavior behavior = new AppIDAuthenticationBehavior();
            behavior.Username = this.Username;
            behavior.Password = this.Password;
            behavior.CrmUri = this.CrmUri;
            behavior.ClientID = this.ClientID;

            return behavior;
        }
    }

}

Add the dlls (all three in the picture, your dll might have a different name) to the GAC using "gacutil -i" command.


You can use SvcConfigEditor ("C:\Program Files (x86)\Microsoft SDKs\Windows\v8.1A\bin\NETFX 4.5.1 Tools\SvcConfigEditor.exe") to add behavior element extension to the machine.config file ("C:\Windows\Microsoft.NET\Framework64\v4.0.30319\Config\machine.config").

From "C:\Windows\Microsoft.NET\Framework64\v4.0.30319\Config\machine.config" you can then manually copy the new line to the "C:\Windows\Microsoft.NET\Framework\v4.0.30319\Config\machine.config" if needed.


You could select the assembly from GAC also.


In the BizTalk Administrator Console -> integration Send Port -> WCF-WebHttp Transport Properties define the security mode as 'Transport' and the client credential type as 'None' to enable HTTPS in the backend address.


Suppress body for verbs: GET


You need to increase maximum received message size.


Add the extension you created


Enter the values


Enjoy!