Thursday, November 15, 2018

Enabling network connectivity via WiFi adapter in Hyper-V

Instructions


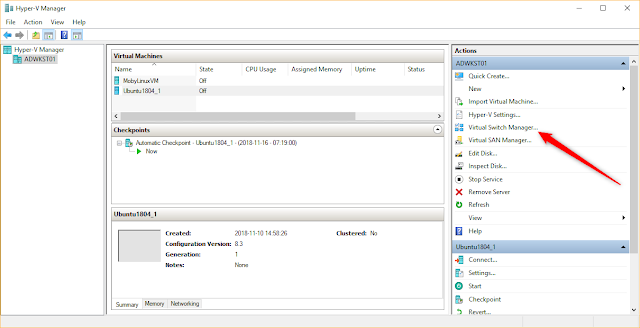
Go to Virtual Switch Manager.


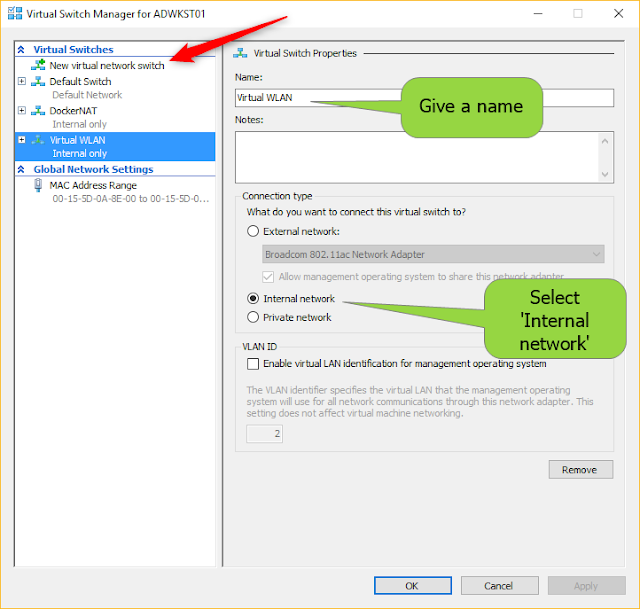
Create a new virtual switch.


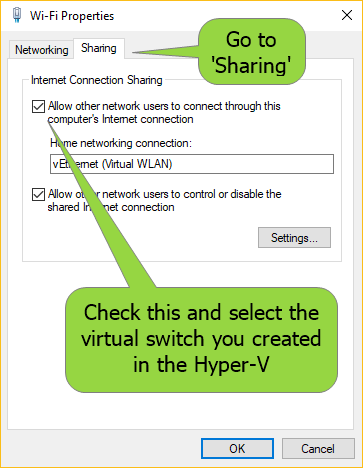
In the WiFi adapter properties enable internet connection sharing.

(If the connection does not work after you restart your computer come to this screen and uncheck 'Allow other...', then OK and then come back to check 'Allow other...' again and select the home networking connection.)


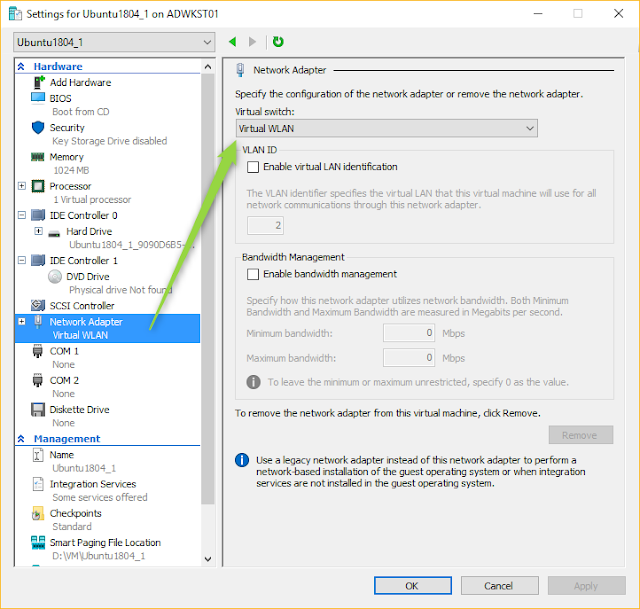
In the virtual machine settings select the new virtual switch.


Wednesday, October 24, 2018

Setting up SFTP public key authentication

Introduction


In this example you create a key pair on a Linux machine and convert the private key using PuTTY Key Generator so that it can be used in PuTTY and WinSCP for example. You could create the key pair on the PuTTY Key Generator, you don't need a Linux box for that. The Ubuntu Client here is the machine where the key pair is created and the Ubuntu Server is the machine where the public key authentication is enabled and that is being connected. The Ubuntu Client machine here is not really the client, we are using WinSCP on a Windows machine to connect the server. Also, PuTTY Key Generator is used on Windows.
There are probably numerous ways to do this and this is in no way the best practice (in the real life you being a Linux guru and all you would send the public key straight to the server machine's authorized_keys, and such fancy stuff), just a hands on example of one way to test the functionality.

See Setting up SFTP server on Ubuntu how to set up an SFTP server on Ubuntu if you don't already have one running.

Enabling Public key authentication


On the Ubuntu Server use sudo nano /etc/ssh/sshd_config to edit the sshd_config -file. Set Pubkeyauthentication yes and you might want to set log level high in case you need to do debugging.
Save the changes with CTRL + O + [Enter] and exit the nano using CTRL + X

After the file has been modified use sudo service ssh_restart to apply the changes.

The log file can be viewed with sudo nano /var/log/auth.log


Creating a key pair


On the Ubuntu Client enter the command to create a private key / public key pair:
ssh-keygen -t rsa

Hit [Enter] to use the default file name (id_rsa and id_rsa.pub).

Enter a passphrase for the private key (you'll need this passphrase later when dealing with the private key, don't lose it):


Now you have created the private key and the public key to the /home/ubuntu/.ssh -directory. The whole process below:


Creating and editing the authorized_keys -file


The next step is to create ~/.ssh/authorized_keys file on the Ubuntu Server machine for the sftptestpubauth SFTP user. First you need to create the .ssh directory under the SFTP -user home directory and also create an empty authorized_keys -file in the .ssh directory.

Log into the Ubuntu Server.
We are setting the public key authentication for one SFTP -user called sftptestpubauth (you need to have the SFTP user created prior to this step, see my earlier post about the matter).

cd to the sftptestpubauth -user's home directory. With the command ls -a you see that there is no hidden directories starting with the dot.


Make the .ssh -directory:
mkdir .ssh
The owner of the directory has all rights:
chmod 700 .ssh
Change owner to sftptestpubauth -user:
chown sftptestpubauth .ssh


cd to the .ssh -directory. If you cannot, apply sudo -i -command to elevate and retry.
Create the authorized_keys -file: touch authorized_keys


Set the rights and the owner:
chmod 700 authorized_keys
chown sftptestpubauth authorized_keys


You can check the rights and the owner with the following command:
namei -mo authorized_keys


Using and converting the files


On the Ubuntu Client machine, open the private key in nano:


Copy the text and put it in a file and save it as a PEM file (or use any extension, can be ppk if you like).


Open PuTTY Key Generator and load the PEM -file (you need to select 'all files' if you used PEM).

Enter the passphrase you defined earlier.


Copy the public key:


On the Ubuntu Server machine in the .ssh directory enter the command nano authorized_keys

Paste the public key to the authorized_keys -file (you could also use the public key from the id_rsa.pub -file on the Ubuntu Client, the strings are different but they both work).


Use CTRL + O + [Enter] to write to file and CTRL + X to exit nano.

Save the private key.


In the WinSCP select the private key you saved in the PuTTYgen.


When you log in you need the passphrase. In PuTTYgen you can save the private key without a passphrase in which case the passphrase is not asked upon login.


You can use Pageant to remember the passphrases for the private keys you are using.


We did not use the original public key created on the Ubuntu Client machine in this example. The private key was converted to a new format and we used the new public key created in that process, but you could as well use the public key created on the Ubuntu Client.

Testing connection from the Ubuntu Client


On the Ubuntu Client go to the user home directory under which the key pair was created in the beginning. Enter the command:

sftp -i ./.ssh/id_rsa -P 22 sftptestpubauth@[myubuntuserver_name_or_ip]

The passphrase is asked and connection to the Ubuntu Server is established.


Testing connection from Windows using psftp


For Windows get the psftp from here.


Friday, October 5, 2018

Disabling Docker DataPower features

Introduction


DataPower image ibmcom/datapower for Docker comes with all features enabled. However, you might want to test functionality/do the development without any extra features installed especially if you are not planning to acquire those licenses to production use. Removing features can be accomplished by using Dockerfile where you can disable features you don't need.
Instructions


Features can be checked from the WebGUI or from the CLI.


'show license' -command also shows the installed licenses/features.


Features that can be disabled are found here:
https://www.ibm.com/support/knowledgecenter/en/SS9H2Y_7.7.0/com.ibm.dp.doc/docker_features.html

appopt: Application Optimization feature
b2b: B2B feature
dg: Binary processing feature
ims: IMS™ feature
sql: SQL ODBC feature

First let's make a Dockerfile -file, in this case to the C:\Docker\build -directory:


Content of the Dockerfile (this disables all features that can be disabled):

FROM ibmcom/datapower
USER root
RUN /bin/disable-feature appopt b2b dg ims sql
RUN set-user drouter
USER drouter


Next go to the C:\Docker\build -directory in the cmd and enter the command:
docker build -t ibmcom/datapower .


Then you can create a new virtual device where the selected features are disabled, for example:

docker run -it -v C:/Docker/idg02/config:/drouter/config -v C:/Docker/idg02/local:/drouter/local -e DATAPOWER_ACCEPT_LICENSE=true -e DATAPOWER_INTERACTIVE=true -p 9090:9090 -p 5550:5550 -p 8086:8086 -p 8087:8087 -p 8088:8088 -p 8089:8089 -p 8090:8090 -p 8091:8091  --name idg02 ibmcom/datapower

In the newly created DataPower you can now check that features you excluded are not installed:


Wednesday, March 21, 2018

Setting up SFTP server on Ubuntu

Overview


In this example we are using Ubuntu application running on Windows 10, but the instructions can be used to set up an SFTP server on any Ubuntu system.

Instructions


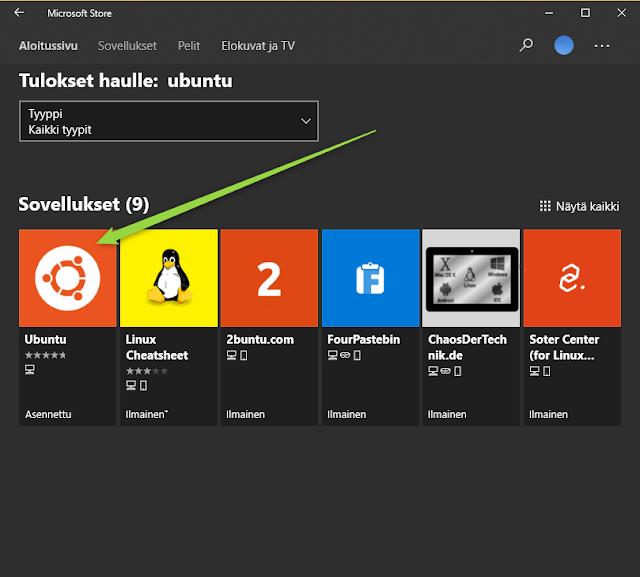
On Windows 10 get Ubuntu from the Microsoft Store


After installing Ubuntu go to the terminal:


1. Make a copy of the original config file

sudo cp /etc/ssh/sshd_config /etc/ssh/sshd_config.factory-defaults

sudo chmod a-w /etc/ssh/sshd_config.factory-defaults

2. Add the 'sftponly' group


sudo groupadd sftponly

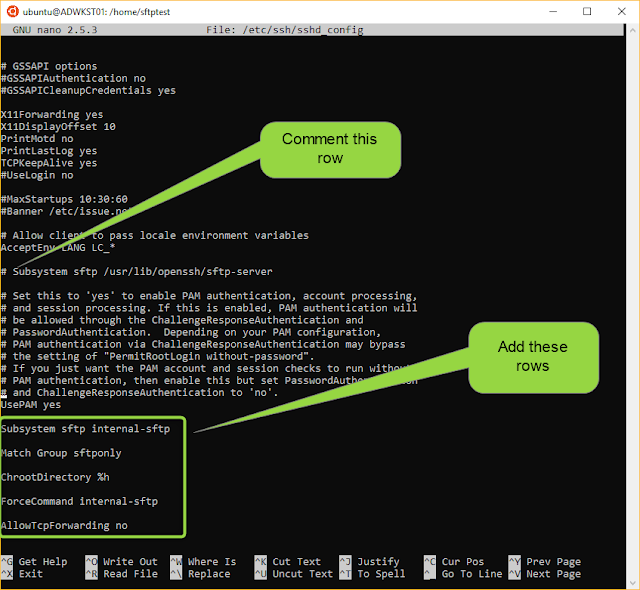
3. Edit the /etc/ssh/sshd_config -file


sudo nano /etc/ssh/sshd_config

In the /etc/ssh/sshd_config -file find a row "PasswordAuthentication" and set it to 'Yes'


Comment out the existing Subsystem sftp command.

To the end of the /etc/ssh/sshd_config add the rows:

Subsystem sftp internal-sftp
Match Group sftponly
ChrootDirectory %h
ForceCommand internal-sftp
AllowTcpForwarding no

Save the changes: CTRL + O + [ENTER]
Exit nano: CTRL + X


4. Create the sftptest -user, put it to the sftponly -group, create directories and set the rights:


Do not use users already existing in the system.
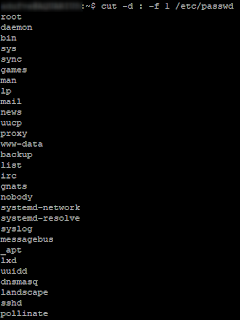
Use the command cut -d : -f 1 /etc/passwd  to get a list of existing users.


sudo mkdir /home/sftptest
sudo useradd -d /home/sftptest -M -N -g users sftptest
sudo passwd sftptest

[enter password] abcABC123!!!

sudo chown root:root /home/sftptest
cd /home/sftptest
sudo mkdir files
sudo chown sftptest:users /home/sftptest/files
sudo usermod sftptest -g sftponly
sudo usermod sftptest -s /bin/false

5. Restart the ssh service


sudo service ssh restart

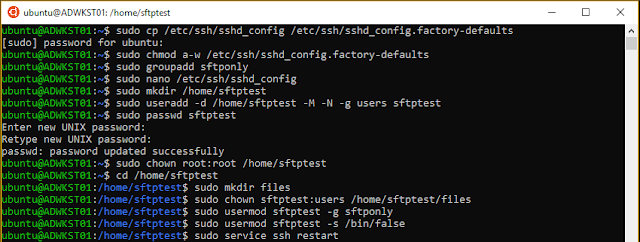
In the end this is what you should see:


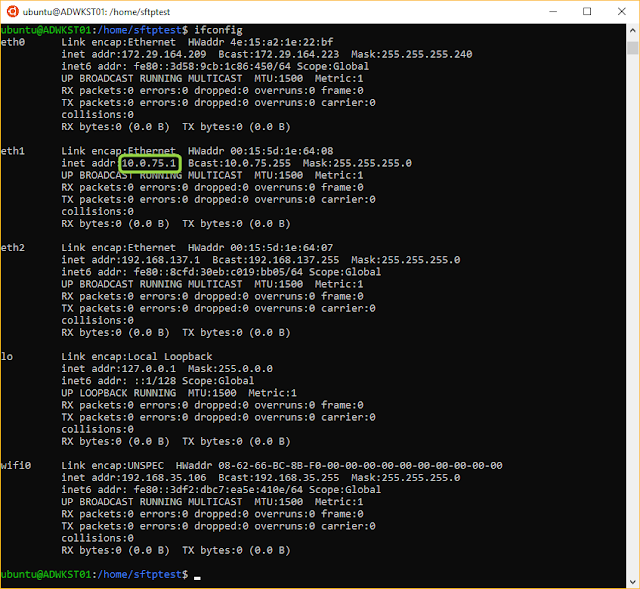
6. Get the IP address for the Ubuntu instance


Enter the command: ifconfig

In this case the IP address we want is the one for eth1


Now you can test connection using telnet:


If the connection works you should see something like this:


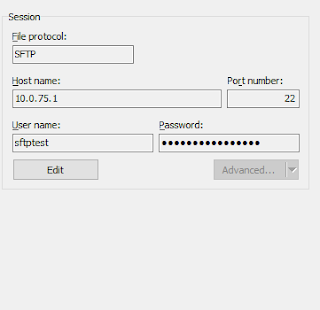
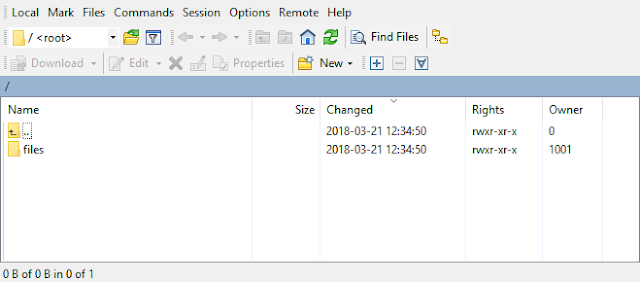
Use WinSCP or such to connet to the sftp server:


You should now see a 'files' -directory that you can use to store data.


When you close the Ubuntu application and start it again you must restart the ssh service with the command "sudo service ssh restart".


Sunday, March 11, 2018

Mule XML to CSV transformation

Overview


In this example you modify the test project created in https://goo.gl/e3tVjG to make a simple XML to CSV transformation.


Instructions


Use the test project (https://goo.gl/e3tVjG) as a template. First define the input pattern to be (.*)\.xml$

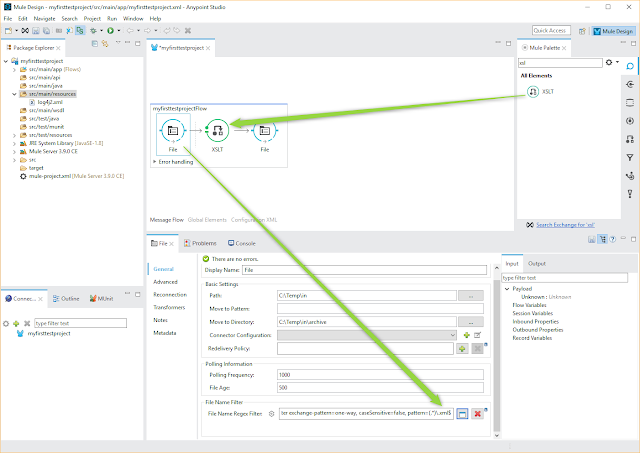
Search and drag an XSLT element between the File elements.

Change the inbound File element filter to (.*)\.xml$


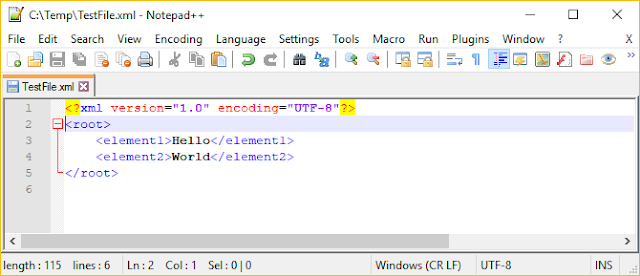
Create a test XML file.

<?xml version="1.0" encoding="UTF-8"?>
<root>
<element1>Hello</element1>
<element2>World</element2>
</root>


Create an XSL file by name TransformationTest.xsl

<?xml version="1.0" encoding="UTF-8"?>
<xsl:stylesheet version="1.0" xmlns:xsl="http://www.w3.org/1999/XSL/Transform" xmlns:fo="http://www.w3.org/1999/XSL/Format">
<xsl:output method="text" encoding="UTF-8"/>
<xsl:template match="/">
<xsl:value-of select="/root/element1"/>
<xsl:text>;</xsl:text>
<xsl:value-of select="/root/element2"/>
</xsl:template>
</xsl:stylesheet>


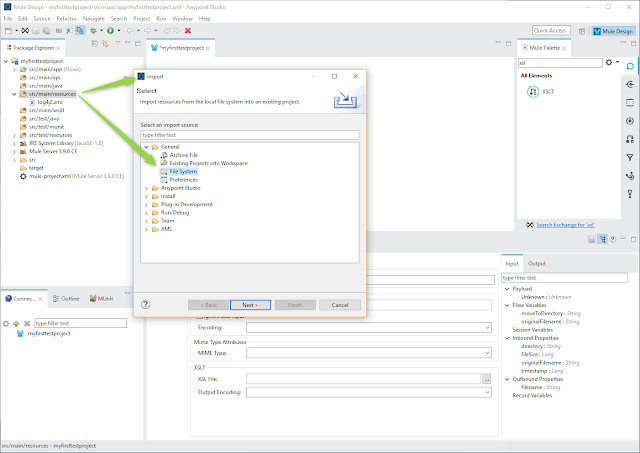
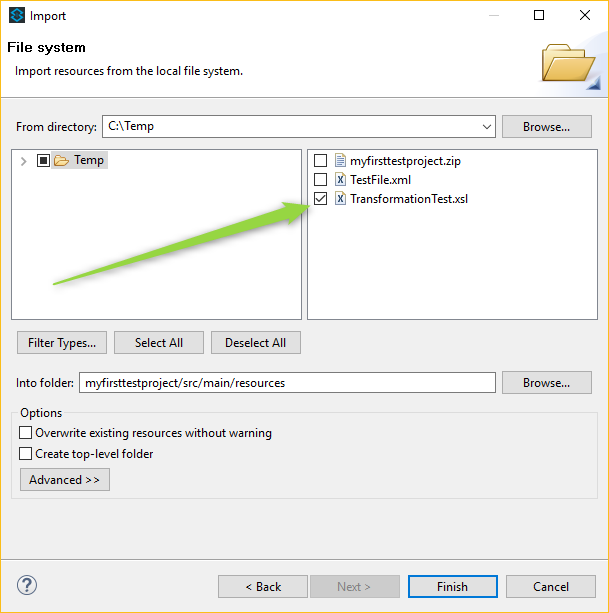
Right click on the src/main/resources directory and select Import. Select "File System"


Import the XSL -file.


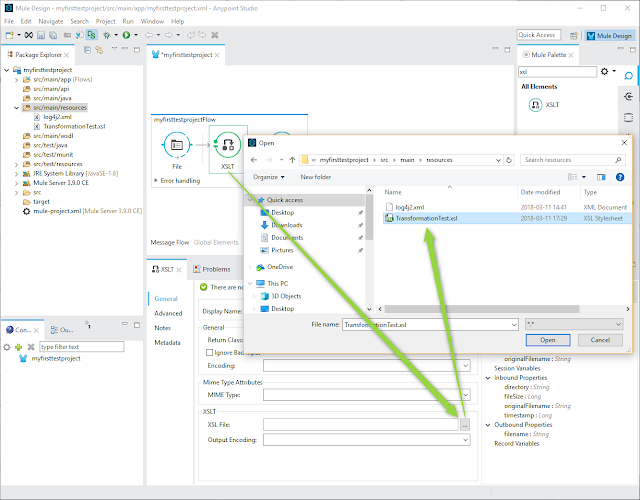
In the XSLT elment select the XSL -file.


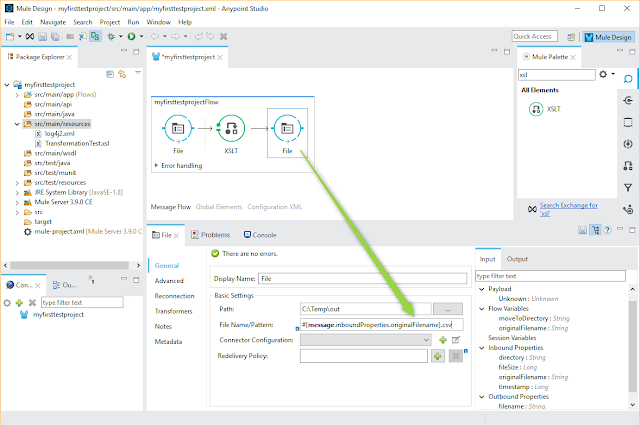
To the outbound File element define #[message.inboundProperties.originalFilename].csv as the File Name/Pattern.


Save the project and run it (right click on the myfirsttestprojectFlow abd sekect "Run project..." ).

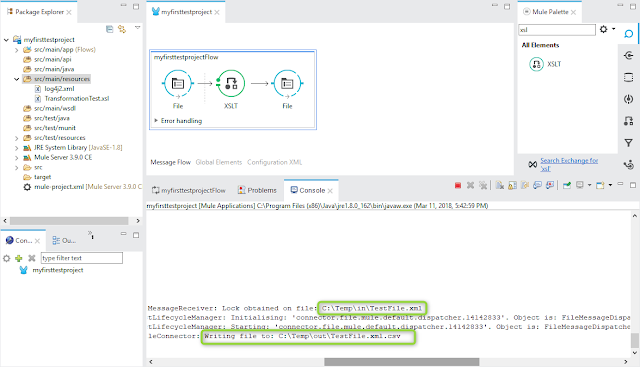
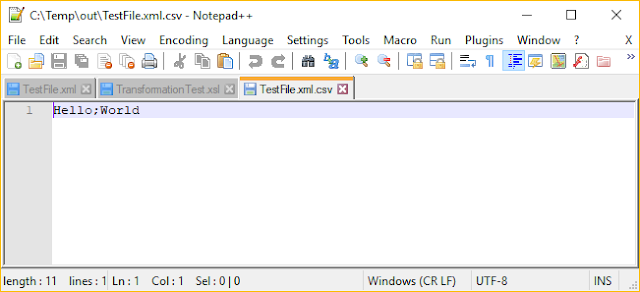
Put the test XML file to the C:\Temp\in -directory. Mule reads in the file, makes the transformation and creates a CSV file.