Wednesday, November 9, 2016

BizTalk integration acting as a proxy to REST API for dummies

Overview

These instructions provide easy to follow steps to create a simple BizTalk integration acting as a proxy to a backend REST API.

Instructions


Create a new project.


Add new property schema item to the project.


Rename 'Property1' to 'search_term' in the 'PropertySchema1.xsd'.


At this point it's probably a good idea to give the application name and set signing.

Go to the project properties.


Go to Deployment -> set Application Name value


Go to Signing and in the key file selection select <New...>


Give a name for the key


Build the solution.


Deploy the integration to BizTalk.


Go to the BizTalk Server Administrator Console. Your newly deployed integration should be there.


Next we'll create receive location and receive port.
Go back to the Visual Studio and go to Tools -> BizTalk WCF Service Publishing Wizard.


Select WCF-WebHttp and DeploymentFrameworkTest application.


Request-Response Receive Port is needed for our proxy integration because it needs talk back to the caller.


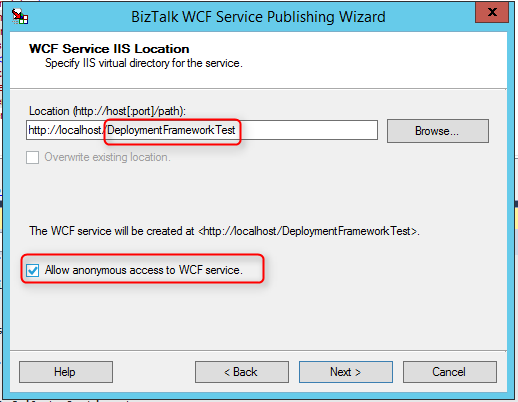
Give a name for the IIS app. Allow anonymous access. You can change this later in IIS if needed.


Create.


Fi


Go to IIS Manager, you'll see the app was created.


Go to the BizTalk Server Admin Console.
A receive location and a receive port were created.


Go to the receive location -> Configure.
BizTalkServerIsolatedHost as receive handler basically means this happens outside the BizTalk, namely IIS in this case. Because we creating a proxy that does not in any way do modifications to the data, pipelines are both PassThru.


To the HTTP Method and URL Mapping insert the following code:

<BtsHttpUrlMapping>
<Operation Method="GET" Url="/{search_term}"/>
</BtsHttpUrlMapping>

Then click 'Edit'.


The value for the property namespace can be fetched from the Visual Studio project.


On the messages tab add 'GET'.


OK


OK


Go to the send ports and create a new port.


Set whatever name you want and click Configure.


Set the URI. In the mapping insert the following (replace [your profile] and [your own API key] with you own values you have got from the service):

<BtsHttpUrlMapping>
<Operation Method="GET" Url="/basic?search_word={search_term}&amp;profile=[your profile]&amp;key=[your own API key]&amp;country=se&amp;version=1.1.3"/>
</BtsHttpUrlMapping>


The mapping values are the same as in the receive location.


OK


In Filters set property BTS.ReceivePortName == WcfService_DeploymentFrameworkTest/Service1
OK


Set retry count to 0


OK


Start the application


If you want to see possible error messages edit the "C:\inetpub\wwwroot\DeploymentFrameworkTest\Web.config".

Set includeExceptionDetailInFaults="true", httpGetEnabled="true", httpsGetEnabled="true" and save the file.


Now you can call the integration that proxies the request to the backend REST API and returns the response.


Tuesday, November 1, 2016

Mule ESB and Java Hello World!

Overview


In Mule ESB using Java for file content modification and other purposes is easy, but often getting started is not - examples might be very complicated and hard to follow. In this example only a few absolutely necessary components are used and the Java code is kept simple.

The user interface might look a bit different if you have newer Anypoint Studio, but the instructions are applicable to that also.


Instructions


Click images to make them bigger to see details.

Download Anypoint Studio (it's free, can be used with Community Edition and does not expire) from https://www.mulesoft.com/platform/studio and install it. The Enterprise Edition that comes with the Anypoint Studio does expire in a month, but we won't be using that.

Create a new Mule project.


Select the runtime you want to use.


If you want to use CE runtime but you don't have it installed, go to Help -> Install New Software, work with All Available Sites and select the runtime you want from 'Anypoint Studio Community Runtimes'.


Drag two file elements to the Message Flow


Drag Java element between the file elements.


We'll also need Object to Byte Array and Byte Array to String elements. Put them between the first File element and the Java element.


Configure the first file element.

Define the directory to poll (E:\MuleDemo\In) and polling frequency (10000 = 10 sec) and file age (5000 = 5 sec). Only process files that start with 'abc' and the extension is 'txt'. This can be defined in the file name filter. Leave other fields empty.


Define the other file element. Only the path (E:\MuleDemo\Out) is required.


Define the session variable. #[payload] is the contents of the file that is read in from the E:\MuleDemo\In -directory and stored in the 'FileContent' session variable.


Now go to Java element and click the + -sign.


Give a name for your Java class and click 'Finish'


A new package and class are created.


Add the code to the package.

package demoproject1;

import org.mule.api.MuleMessage;
import org.mule.api.transformer.TransformerException;
import org.mule.api.transport.PropertyScope;
import org.mule.transformer.AbstractMessageTransformer;

public class JavaTest  extends AbstractMessageTransformer {

@Override
public Object transformMessage(MuleMessage message, String outputEncoding)
throws TransformerException {

String sFileContent = (String)message.getProperty("FileContent", PropertyScope.SESSION);
String sNewFileContent = "";

sNewFileContent = "Hello World! " + sFileContent;

return sNewFileContent;
}

}

Now it should look like this.


Create a new file (NOT starting with abc if you have already started the integration) in the E:\MuleDemo\In -directory. Once created, rename it to 'abc_testing.txt'.


Start the integration by right clicking the flow and selecting 'Run project demoproject1'


The integration is running and the file was read in, modified by the Java code and moved to the E:\MuleDemo\Out -directory.


Check that "Hello World!" was added to the file before the original content.


Now you are good to go with less trivial scenarios.